|
Managing Your E-mail Resources
Like all other services in NetFronts, the e-mail service is a collection of resources, each having its own function. These resources serve as bricks to build any kind of e-mail system. You can construct it from the following four resources:
- Mailboxes to send and receive mail from your account.
- Forwards to forward mail from your local mailbox to any other e-mail address(es).
- Aliases to create alternative addresses for your existing mailboxes.
- Lists to send mail to multiple users.
Each of these resources has its individual properties.
Your Current E-Mail Resources
To open your mail settings page, select Mail Info in the user menu:
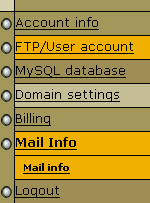
In the page that appears, select the domain from the drop-down box and click the Go button:

The window that opens is the mail information for the selected domain:
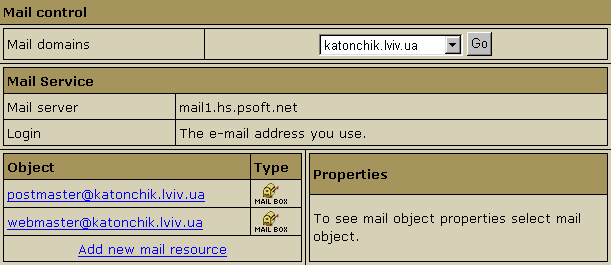
The Object section that appears lists the resources that constitute your mail service. On the right of each resource, there is an icon showing its type. Click the icon to view or change resource properties.
Adding New E-Mail Resources
To add a new resource, click Add New Mail Resource at the bottom of the list. A new form appears:

Four types of resources are available in the drop-down box:
- mailboxes;
- mail forwarding rules;
- mail aliases;
- mailing lists.
Mailboxes
If you select Mailbox, the following form will appear:

- E-mail address: enter the name of the mailbox that you would like to create.
- Password: set a password for this mailbox.
- Comment: enter a comment that will help you identify this address among other mail resources.
Note: Postmaster mail box is a vpopmail service mailbox and it is not related to NetFronts.
You don't pay for it. It doesn't mean you can't use it. However, you can neither delete this mailbox nor change its quota! The postmaster mailbox quota is unchangeable. To forward postmaster email to one or more other addresses, create a forwarding object with exactly the
same name as the postmaster mailbox.
Note: You can have a mailbox named, say, mailbox1@domain.com and then create a forward with exactly the same name, i.e. mailbox1@domain.com. However, in NetFronts no mail sent to mailbox1@domain.com is stored in it. A forward works only as a foward.
Forwards
If you select Mail Forward from the drop-down box above, the following form will appear:

- Local e-mail address: enter the address that your mail will be forwarded from.
- Remote e-mail address: enter the address that your mail will be forwarded to. This can also be your local address, in which case you must write it in full.
- Comment: add a comment that will help you identify this forwarding rule among other mail resources.
To add more destination addresses for this forward, click the Edit icon in the Remote field in the Mail Forward Properties section.
Note: You can have a mailbox named, say, mailbox1@domain.com and then create a forward with exactly the same name, i.e. mailbox1@domain.com. However, in NetFronts no mail sent to mailbox1@domain.com is stored in it. A forward works only as a foward.
Aliases
If you select Mail Alias from the drop-down box above, the following form will appear:

- Alias Local Name: enter the alias name you would like to create.
- To Mbox: select the local mailbox for which you would like to create the alias.
- Comment: add a comment that will help you identify this alias among other mail resources.
Mailing List
You can create and manage multiple mailing lists from one account.
*The Mailing Lists feature is implemented through EZMLM/IDX MAILING LIST MANAGER (www.ezmlm.org). This tool lets you to:
- distribute messages,
- handle subscriber addresses,
- archive messages,
- retrieve multi-message threaded archives,
- set digests,
- administrate from a remote computer,
- moderate messages and subscription,
- restrict user privileges,
- trail messages,
- prefix subjects,
- store subscriber names
...and more.
To create a mailing list, choose Mailing List from the drop-down box above, and the following form will appear:

- E-mail address: This is the e-mail address from which mail will be forwarded to subscribers. Important: you can only enter a new e-mail address. If you need to use an existing address, first delete the resource that uses it.
- Comment: add a comment that will help you identify this address among other mail resources.
After you have created a mailing list, you need to configure it according to your needs.
Configuring E-Mail Resources
To view or change settings for a resource, click the icon on its right. The list of settings appears in the Properties box. It is different for each resource type.
Mailbox
To change settings for an existing mailbox, click the respective parameters:
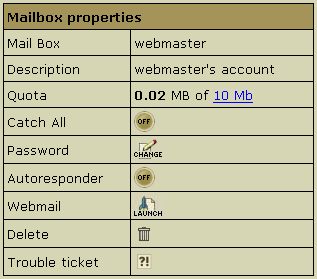
- Quota: change the quota for this specific mailbox. Mailbox quota is not related to the site disk space quota. To change your mail quota, enter its new size in megabytes. From that moment on you will be charged for the difference between this new amount and the default free amount. This charge will automatically be added to the recurrent fee at the beginning of each billing period.
- Catch All: designate the mailbox to receive messages sent to nonexistent e-mail addresses in this account. For example, somebody sends a message to support@yourdomain.com, which is not a valid e-mail address in your account. By default, this message will bounce back to the sender with an error notification. To have this message land into one of your mailboxes, for example webmaster@yourdomain.com, you should mark this account as Catch All. Each account can have only one Catch All mailbox. If you switch it ON for one mailbox, it will go OFF for the old Catch All mailbox.
- Password: click the icon to change the mailbox password. After you have changed the password, the old one becomes invalid. Remember your new password to log in for future sessions.
- Autoresponder: set your mailbox to respond to the sender of incoming mail with a preset message. You need to compose a separate response message for every mailbox. (For details see below)
- WebMail: go to the web e-mail client to send or receive e-mail messages.
- Delete: delete the mailbox. You cannot delete a Catch All mailbox. To delete a Catch All mailbox, first switch Catch All OFF.
- Trouble Ticket: send your technical administrator a Trouble Ticket to get help with the mailbox.
Forwards
Forwarding rules do not have parameters to change:
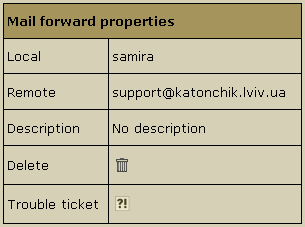
- Local: the local address your mail is forwarded from.
- Remote: any local (the same account) or remote address your mail is forwarded to.
- Description: a comment that will help you identify the forwarding rule among other resources.
- Delete: click the wastebasket icon to delete the forwarding rule.
- Trouble Ticket: send your technical administrator a Trouble Ticket to get assistance with the forwarding rule.
Note: You can have a mailbox named, say, mailbox1@domain.com and then create a forward with exactly the same name, i.e. mailbox1@domain.com. However, in NetFronts no mail sent to mailbox1@domain.com is stored in it. A forward works only as a foward.
Aliases
Like forwarding rules, aliases do not have parameters to change:
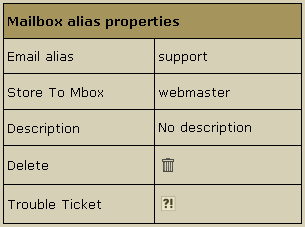
- E-mail alias: the alternative address of the mailbox.
- Store to Mbox: the primary (real) address of the mailbox.
- Description: a comment that will help you identify this mail alias among other mail resources.
- Delete: to delete this alias, just click the wastebasket icon.
- Trouble Ticket: send your technical administrator a Trouble Ticket to get assistance with this alias.
Autoresponders
Autoresponder is an attribute of a mailbox. Whenever a message arrives in a mailbox, the system immediately sends a uniform response back to the sender. Use this form to compose an autoresponse:
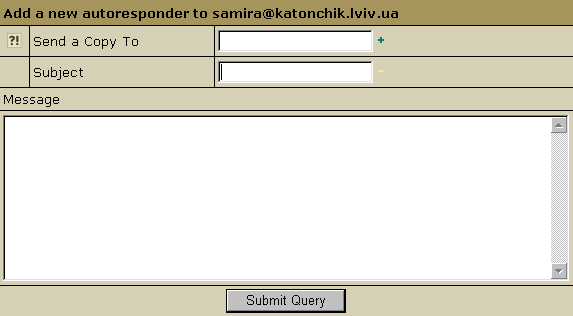
Send a Copy To: the optional e-mail address to which copies of response messages will be e-mailed.
Subject: the subject of the response message, e.g. receipt confirmation.
Message: the body of the response message, e.g. Your message was received. Thank you.
|